
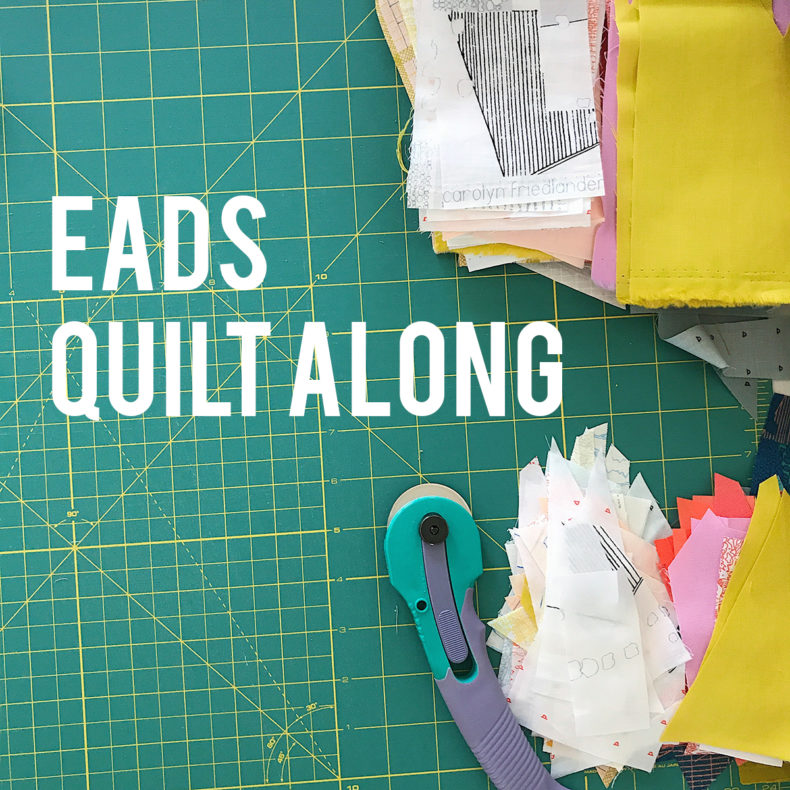
Eads Quilt Along #1: Getting Started.
You ready?
Let’s start with your sewing setup…or actually, let’s start by taking a look at mine.

Here’s my current sewing set-up. I’ve got my sewing machine set up on a big desk. It’s huge, which is awesome, because I can also fit my serger and coverstitch machine on it without any problems. Since we’re talking about paper piecing today, I’ll save the specifics on my serger/coverstitch setup for later, but the above pic gives you a nice overview. You’ll also notice that I have a small folding table to the left of my machine. This is awesome and so handy. It gives you cutting and pressing space while sewing, as well as quilt-resting space for when you’re quilting. (FYI it’s also where I throw my smaller, non-straight-stitch machine when I need to sew buttonholes.)
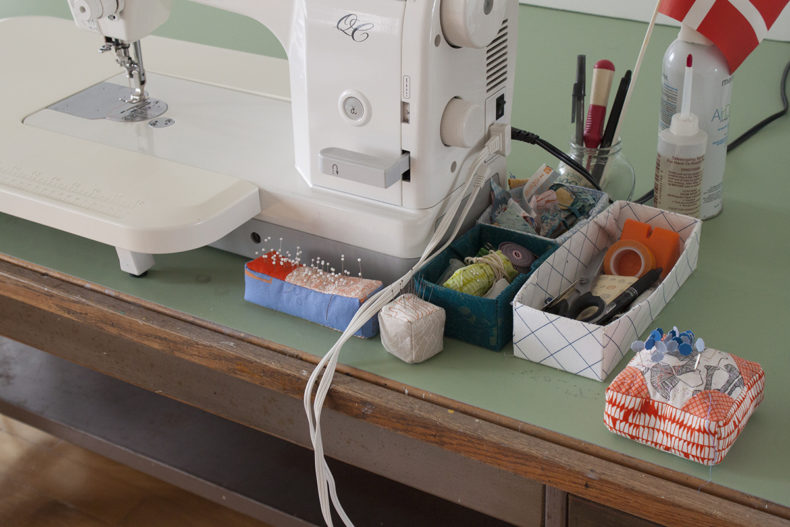
As for (paper piecing) tools, here we go.
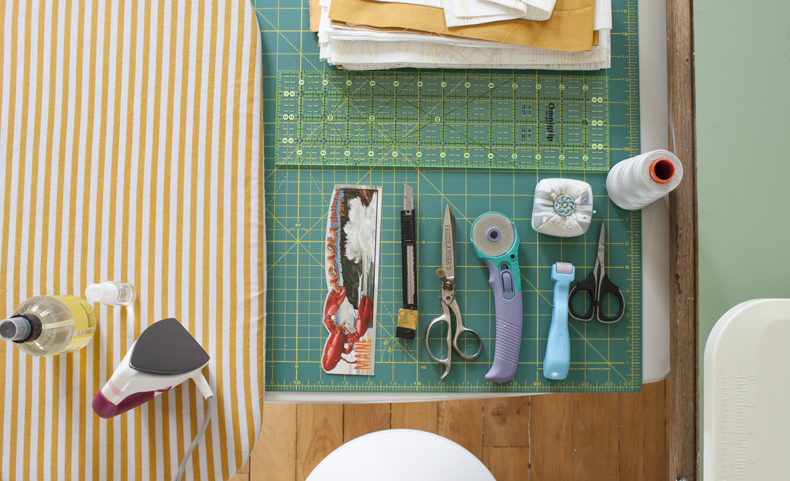
From left to right and up:
+ Flatter. Yep, I use this, especially since I designed the labels for the newest scent. (See next pic for closer look)
+ Mini iron by Clover. This is a new addition as of the most recent Quilt Market. I’m obsessed with this iron and mad at myself that I didn’t get one sooner. I bought it to use during the show, but it’s quickly become my go-to while working.
+ Small ironing board. This last Quilt Market seemed to up my supply ante as this and the mini iron were purchased to use at the show, and I cannot imagine sewing without either of them! This mini ironing board came from Ikea. It’s $5 and I covered it in some Blake. Small and portable. It can’t be beat.
+ Cutting mat. You’ll need one. This 18″x24″ fits perfectly on my folding table and lives there 99% of the time. Rotating cutting mats are handy, but for the Eads block, I’ll not be using one. Usually if I’m using a rotating mat, I’ll use it on top of this one anyway.
+ My Maine bookmark. A friend gave me this, and I love using it to fold back the paper. Anything else will work…an index card, the pattern itself, etc.
+ Xacto knife. I have many of these and use them to slice up my paper templates. You could use scissors too, but I like the speed and efficiency of an Xacto.
+ Paper scissors. Either these or an Xacto will be needed to slice up your templates.
+ Rotary cutter. Pick your fave. This one by Kai is lightweight and lovely. (Full disclosure, I have many rotary cutters in many sizes. This is my preference for paper piecing.)
+ Clover Roll & Press. I’ve not always been a fan of seam rollers until meeting this one. I love it. It’s lightweight and very effective. It also feels good in my hand.
+ Small scissors. No matter the project, you’ll always need a pair of small scissors for thread clipping and stuff like that. This one lives by my machine.
+ Pins and pincushion. Yep. Standard stuff. (FYI Cute Dumpling Pincushion pattern by Alchemy Tea.)
+ Thread. I use Aurifil 50wt cotton when I’m piecing. As for color, match to your lightest fabric.
+ Ruler. This neon, Omnigrid 4″x14″ ruler is one of my favorites. This particular size is perfect for the Eads project. With any ruler make sure the markings are clear and legible to you. Just to note, add-a-quarter rulers are well liked for paper piecing. Feel free to look into them if you’re interested. They are great, but my personal preference is a regular ruler, as it’s a multi-trick pony.
+ Fabric. You’ll need that! See back of pattern for amounts.
+ Paper templates (not pictured, but needed). There are MANY different papers for paper piecing out there. If you’re up for trying them out to see what works best for you–go for it. My preference is recycled office paper. It’s very available, it’s a little more responsible and I prefer its weight/thickness.
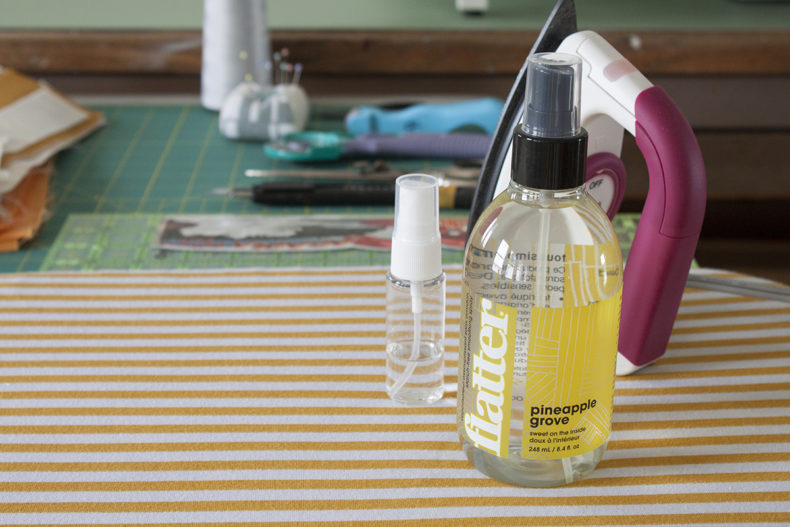
Handy enough, this Clover mini iron comes with a mini spray bottle. The sprayer is surprisingly effective! I fill mine up with flatter and keep it nearby.
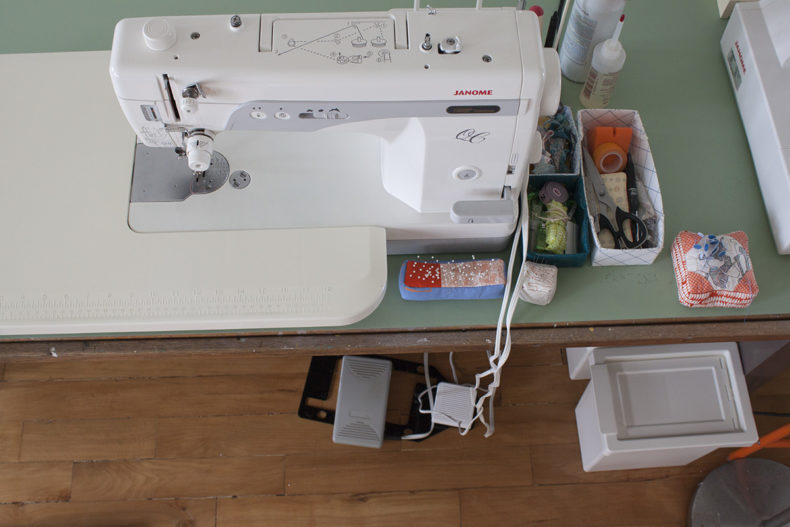
To take a closer look at my sewing set-up, I’d like to point out a couple of other things. First, an extension table–no matter the project–will make your (sewing) life much easier. Since my table doesn’t have a cut-out for my machine, the extension table expands the flat area of my sewing surface.
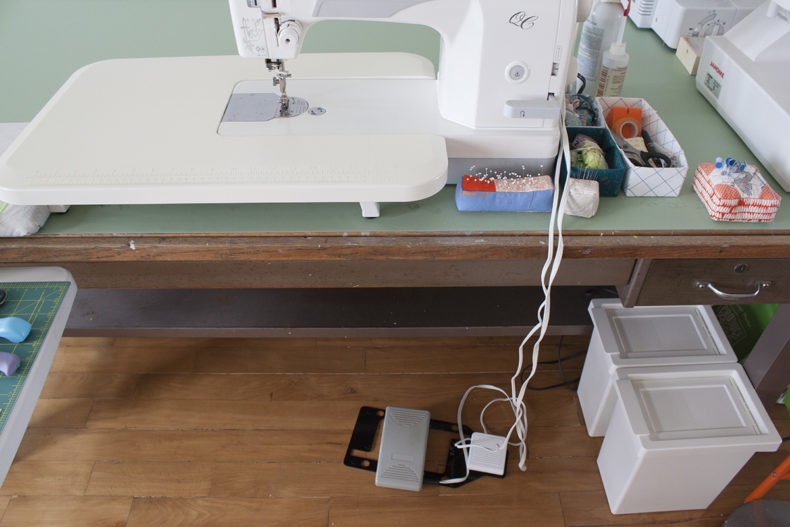
Let’s take a look at the floor for a sec, and not just because it’s freshly vacuumed, although that is a miracle to be captured! I’ve got 2 waste baskets to the right (both from Ikea). One is for fabric scraps and the other is for paper scraps. Since I do a lot of paper piecing, I like having a separate bin just for paper so that I can recycle it later.
Also of note down here is my new(ish) pedal for operating the thread cutter–hands free! I love my machine, but unlike some other straight stitch machines, the thread cutter function is only operable by the button on the front. After talking to some machine folks, we discovered a 3rd party foot pedal that works with this machine. It couldn’t be easier, you just plug it in (you must have the outlet on your machine–look for a hole with a scissor icon next to it) and start cutting. It’s life changing. I know that sounds dramatic, especially if your machine doesn’t have a thread cutter at all, but it is. One of my most prized functions is the automatic thread cutter, and the ability to operate it hands-free–yes!
I imagine that someone will ask me about a knee lift, I know that those are handy too, but the screw on mine broke, so until I get my act together and locate a replacement, it’s not part of my routine.
I’m a pin hoarder and like having different pins for different fabrics, projects, etc. It makes life easier to store different types in different pincushions. The above are from my Crew pattern.
I also love having these nesting boxes (pattern by Aneela Hoey) by my machine. They hold bigger scissors, my seam gauge, washi tape, wonder clips, marking tools, etc. There are so many handy things that you’ll want access to while you are sewing, and these nesting boxes are a pretty and functional way to house them.
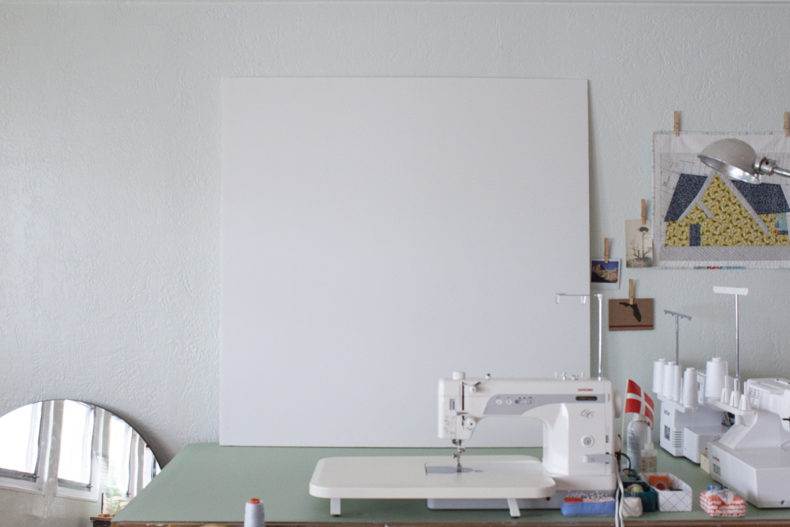
To back up a bit, you’ll also notice a piece of foam core against the wall behind my machine. I have many of these panels floating around, and while originally purchased for something else, now I use them as design walls. This one is freshly blank, because I’m ready to fill it up with some Eads QAL action. Yeah!
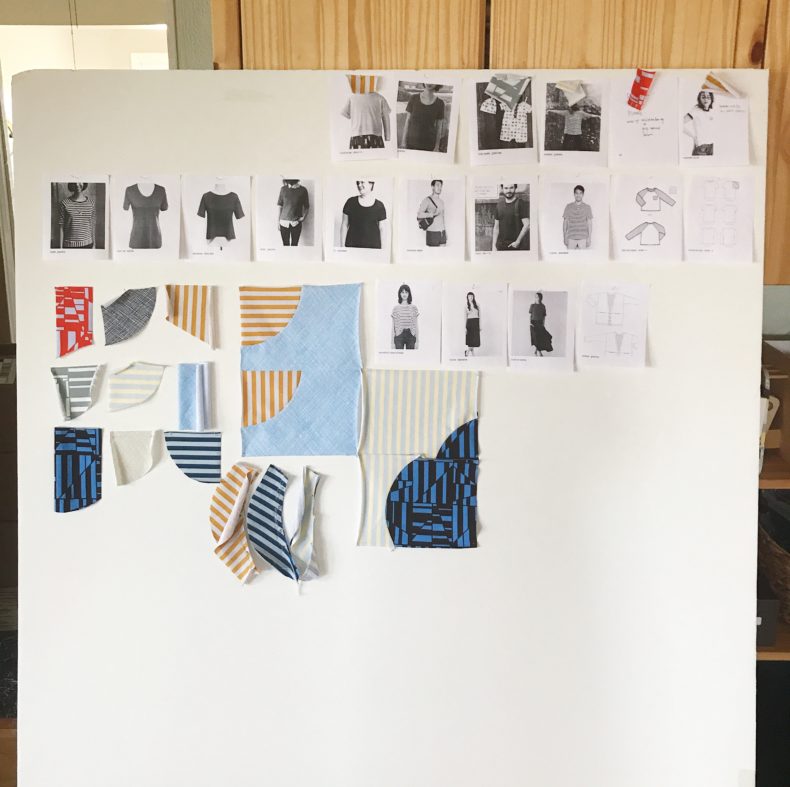
Just to give you an idea, here’s one from when I was working on blake release projects. I love having multiples, because I am always working on multiple things happening at once–like I’m sure you are too. You can either purchase foam core panels like these, OR a cheaper option would be to hit up your local hardware store and grab some rigid insulation panels. They come in 4’x8′ sheets, and you can easily cut them down with an Xacto and/or cover them in batting.
Let’s talk about project planning.

Here’s the extent of my project planning for the first Eads that I made. After getting the design nailed down, I took colored pencils and markers to a layout and started exploring options. You can see that I didn’t spell everything out, I’d say that these explorations were more about getting a sense of the feel in terms of color and tone. After doing that, I made a block, just to see how that went. It was after this point that I pulled the rest of my fabrics.
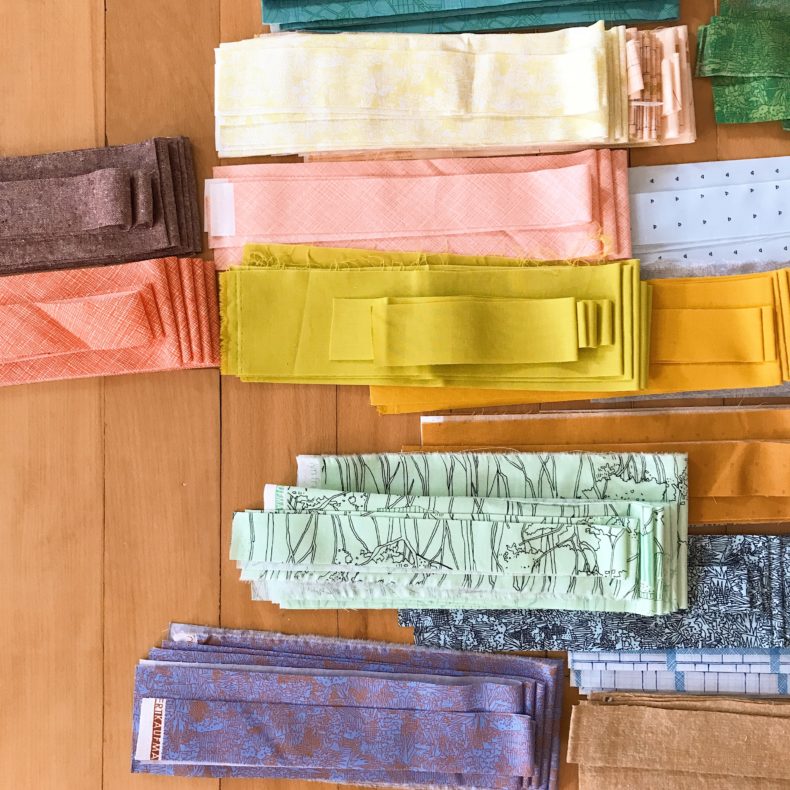
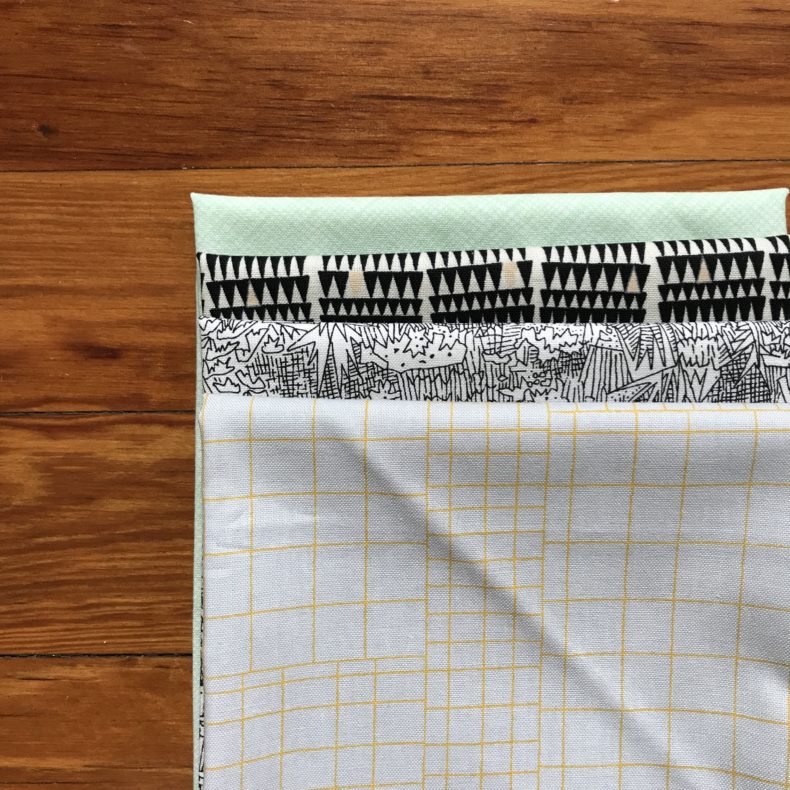
And yes, this is actually how I often to work and definitely how I worked things out for this project. While cutting out my strips (as outlined in the instructions), I laid them on the floor. You can start to build relationships between the different colors and prints this way, and it’ll also give you a good and visual sense of how your pickings are shaping up.
Of course, you may have a different way of working, so never feel bad about working in a direction that feels most comfortable to you!
OK, so I’ll stop here for now. But I’ll leave you with some tips:
+ Assess your sewing space. It’s good to be comfortable and have access to the things you need for a project.
+ Use the coloring sheet that is included with the pattern to start mapping out ideas and directions for your project.
+ Have FUN pulling fabrics. Assessing what you like and don’t like as you go helps better shape the project to your tastes and interests.
+ Ready to paper piece? Learn how from one of my videos on Creative Bug.
And one more thing. Let’s do a giveaway! I’ve got 4 fat quarters of my fabrics from a few different collections. Just leave a comment on this post sharing something special/helpful/non-helpful about your sewing space or favorite supply. I know you guys will have some worthwhile tips. I’ll pick a winner randomly on Monday, June 19 10am EST. Giveaway now closed–thanks to everyone for participating!
If you need a copy of the pattern, you can check quilt shops for the paper version or here for a digital version.
Share what’s happening on Instagram using #eadsQAL . I’m eager to see your progress!
I’m so excited to do this QAL with you!!! Great post and if anyone needs help learning about paper piecing, I think your classes are really helpful.
Starting on my coloring layout today! You have great tips. Can’t think of any others.
My kitchen table is round and makes sewing harder. Maybe I should just use a card table instead.
I’ve just recently acquired an “add a quarter ruler” and I love it!! I’m new to paper piecing but it helps me a lot!!
I work at my dining room table, so I am not quite as organized as you, but I always have a rotary mat and tiny scissors close by! I don’t know what I would do without them. I am excited to start this QAL!!!
Loving the QAL so far. In my space, I had to try a few arrangements, but I finally found a way to get maximum natural light on my sewing/cutting surfaces. I find that makes a big difference!
New to quilting. Just ordered a FQ bundle of Friedlander for a Beyond the Reef Mochi quilt! Looking forward to starting that 🙂 I do like the idea of a pressing area right at my desk- the efficiency!- but I don’t have that in my small space. With my current setup I do appreciate that the pressing task gets me mobile, regularly up on my feet, walking, standing…. I been hearing a lot this phrase “sitting is the new smoking”… anyway- also- thank you!- this post is inspiring me with new organization goals! Pins per project- love it. Also appreciate the example you set with your eco-conscious practices. Would love to try Flatter someday. Peace, gratitude!
I use half an A4 size see through document wallet to hold my current needle turn stuff so that I can see quickly what’s what when I’m running out the door and everything stays flat and not embarrassingly crumpled like a dog rolled around on it!
You have already included the tip that I would have recommended . It’s on the bottom of page 4. ” Fold paper template back along seam line”. That tip was an aha moment for me after years of paper piecing.
Excited about start this!
So looking forward to this QAL! I love your fabric colors for your new quilt! I love using my Add-a-Quarter Plus ruler for paper piecing. Definitely a tool/gadget that has been worth the buy!! It will come in very handy with this project. Excited to sew along and be inspired by everyone! 🙂
Great post – thanks for sharing. What I love the most about my space is my huge work table that holds my machine and cutting mats. And the best thing about the huge table is I have space for my quilty friends to come over and sew with me.
Love seeing your setup, and thanks for including the coloring page with the pattern. I love to use coooring pages, particularly to use up scraps/stash by planning based on what I already have.
the biggest problem I have with paper piecing is that I try to economize with my fabric cuts – often my end result does not give me the cover that I need and I have to rip and work with another piece resulting in more fabric waste that what I should have had……when will I ever learn?
I spaced on the start date of this, but I’m excited to give it a go once I get my pattern. I think you listed my best tip which is to take a thicker stock of paper like postcards or poster boards to use to help fold back the pattern.
I like to keep a quilting notebook. I keep ideas for projects, the coloring sheets I do for planning, and dates for when I start, the fabric that I use, and (eventually) pictures of the final product. I’m very tactile and prefer to keep these notes analog instead of digital. Hopefully you guys find that useful!
p.s. The dotted moleskines are the best!
Hi Caroline! Your quilting space is very inspiring! I too have a small work space to the left of my sewing machine. In order to keep the work surface completely clear, I have an Elfa Utility board mounted on the wall above it holding all my tools (scissors, rotary cutters, pin cushions – even a tiny lamp!)
I learned a few years ago that Goodwill takes fabric scraps (and unusable clothing) for textile recycling—at least one more use before going to the landfill—so I keep a separate bag for scraps that are too small to use in sewing, and take it with my donations when it’s full. I’m not usually a quilter (I sew garments, knit, etc.) but I really like your aesthetic and patterns, so it’s fun to follow along.
My Bright Light addition to my sewing machine is essential…the machine light and my lamp do not give enough light right where the needle meets the fabric. Since the Bright Light is adjustable, I can see what I’m sewing day or night!
Here’s my tip. Position your sewing machine so the needle is directly in front of your body! Not off to the side, I see so many people who are off to one side and it makes sewing so awkward.
I keep my ironing board/iron in the guest bedroom next to my sewing room/office so I can get my steps in a little when I actually have a day to sew!! Might have to move it closer for this project though,so wish we had an ikea nearby would love one of those small ironing boards!!
My husband attached a small collapsible table (or a “Frankenstein” table – top made from scrap wood and legs from a folding table) to the back of my sewing machine table to give me about 3 extra feet on the back of my machine. It has been a tremendous help! Also I love using a June Tailor Quilter’s Cut n’ Press to the left of my machine. Double the use!
With paper piecing after I’ve pieced one or two blocks and ripped off the paper, I use those paper “patterns” (the trash pieces) to rough cut the remainder of my fabric including a generous 1/4″ seam allowance. Gives a nice accuracy quick and easy😍
My ironing board is perpendicular to my sewing machine table, not great for exercise but perfect for efficiency.
Thank you for these wonderful tips! Love them! The best tip I can give in addition is to use a powercord with on/off switch for your iron, even if you do not need a power cord for distance. I feel so much safer since having that installed!
Stumbled upon this quilt along on Instagram. You are the first sewer I’ve seen with an old drafting table like mine! Mine was a hand me down from my mother. We are/were both in the drafting field. I see that your presser foot is on the floor whereas mine is on the metal brace at the bottom. Currently I’m using a wooden bar stool to reach the top but it’s not very comfortable! Do you find the stool you’re using to be comfortable to sit in while sewing? I’d like to know where you found that tall folding table!
Ah! That’s awesome that we’re table twins! I really love mine. I actually got mine from the people I got my house from. I think they picked it up at an old school furniture sale or something. I love that it’s an old drafting board. As for the height, the previous owners actually chopped off the legs a bit to make it sit lower, so it’s pretty perfect for me. Maybe you could get a carpenter or someone handy to look into that? OR, yes, the stool that I use is also from Ikea and it does have an adjustable height. You could try that too. Hopefully one of those options will work for you!
Love the ironing spray! Let’s do this!
So many great tips in the comments! Mine is to buy a wall-mounted knife magnet (IKEA sells one) and use it to store your scissors and other blades. It keeps them out of the way and protects them from getting chipped and dull, as can happen when storing them in a pile.
Your details of how you set up and get ready to sew are fantastic. My area never looks this organized. I am going to try to work on that in the next month or so I am sure I will be more productive. I had to mention that your Kai rotary cutter is the same one that I have had since the 1980s! And it is still cutting (with a change of blade).
am tempted to get mini iron but feel that getting up frequently is good exercise! love paper piecing also and your fabrics very very much.
I also use a separate pin cushion for each type of pin. That way I can reach for a pin without looking and know it will be the right type. This past weekend, I set up my sewing area so that it now has all of my frequently used tools hanging in plain sight and within reach. It’s made a huge difference already. If I laid my ruler/scissors/stitch-ripper/etc. down on a flat surface, it would inevitably get hidden under fabric or paper, and I would waste time feeling frustrated, looking for something I just had a few minutes earlier. Not a feeling I want to associate with sewing!
Thank you for sharing your space and tips, I enjoy learning from those who know more than I. It’s how we grow, then we can share with others…it’s timeless. No particular tip, but rather a story of appreciation for this hobby of ours. My grandma was a quilter who was ahead of her time (I believe she was born around 1898), who, in spite of working only with what she had, made stunning quilts that could compete at a modern show today (white and gradient solids!), and all hand pieced and quilted. It humbles me and all that I have to choose from.
I actually like my sewing space to be inconvenient, meaning my ironing board is on the other side of the house because I hate sitting down. This way I’m constantly walking back and forth.
One of my biggest tips for paper piecing is to start sewing with the needle down into the pattern. It’s easier to maintain a straight line that way. If your sewing machine is on a regular height table an awesome accessory table is a an old typewriter table. They are not hard to come by in antique stores, etc. they are little metal tables with drop sides that have wheels for rolling but can be locked into position. They are perfect. As for your hands free thread cutter one of the problems I have with mine is the thread nesting or knotting on the backside of the next seam. Instead I always have to hold my thread tails. How does this work for you?
Thread nesting, knotting or even coming unthreaded are not good! Often a good machine service person can tinker with your settings to get it sorted out. I’d give that a try, because that’s no fun!
My sewing space tip is to have one. I’ve decided to leave my machine set up in the parlor. Having it always at the ready is just as important as other activities.
I love your layout. Very similar to mine but I keep my table on the right if I’m using an iron on it. I usually enter my sewing cockpit from the left so it’s out of my ingress/egress path. I keep a tray of my go-to goodies beside my machine too. I prefer snips over mini scissors though. And, my additional item is a light source so that I can see if my fabric is going to fit a section. Thanks, I can’t wait to follow along.
I do a lot of needle turn appliqué, and I’m especially loving it since learning your basting method. The supply item I can’t do without is my Clover desk needle threader. Definitely a life-changing product for me!
I just moved into a smaller studio, so I have a wall that doubles as a place to display my color wheel quilt and my design wall. So if you don’t have room for both, when you need the design wall just take down the quilt, and hang your design wall. Both of them hang from the same 3M hooks so it works great!
I still need that foot pedal – thank you!
I really need to be more ruthless in my sewing space and re-organise so that I can have a piece of accessible wall on which to hang some gridded flannel to use as a design wall. It is possible to use the floor, or the double bed, but it just doesn’t give as good a viewpoint. Or I might have to start making small or miniature quilts !
I keep a jar by my machine to collect too small to use cotton scraps and cotton thread. I put it in with the compost when it is full. Looking forward to the QAL.
I currently am organizing my sewing room and have all of my fabric laying on the floor. This creates a positive (being able to easily see all my fabric) and a negative (I can’t walk into my sewing room 😆).
Like you, I have to clean up after each project! I do wish I could stay more organized during the process, and for a couple weeks that works, but then I revert to my old messy, power sewing ways! Now that I’ m retired perhaps I can get a better handle on neatness! Love your tips! We are remodeling right now and I’m hoping to have a sewing space where I can get the machines in a more useful layout, instead of having to pack away all the time. Your setup looks efficient and organized. Thanks for the tips.
I like to keep clear scotch tape available when paper piecing. When I (inevitably) make a mistake and have to break out the seam ripper, I can just tape the paper pieces back together and keep going where I left off.
I have a bright Bendable Bright Light attached to my sewing machine and it really helps me see things better. My sewing machine has a light that comes with it, but it’s still night bright enough to see things up close at night.
Love your organization tips. I’ve got a magnetic strip (like for knives) on my pin board above my sewing desk. All my rotary cutters, scissors, seam rippers, containers with clips are within easy reach.
Not a tip actually, but I really opened my eyes to that small folding table with your ironing board on it. I have that very table………and I keep a cutting mat taped to the top. I’m sitting right next to mine right now and it feels kinda spooky. *S* My table has a couple height adjustments, wasn’t very expensive at Amazon and has turned out to follow me everywhere no matter the project.
I feel so with you Carolyn, tiding up the sewing space gives such a good feeling – all set with new energy for the next project. Would love to stitch-up some nesting bowls for my place (since loong).Thanks for the chance.
One of my favourite things is my ironing surface, which is currently about 5 ft x 3.5 feet! I went to Home Depot and had them cut a sheet of mdf to size, then I painted it with primer to help seal it so it wouldn’t warp from absorbing steam. I covered it with a layer of thin cotton batting and then some of that silver ironing board fabric, both attached using a staple gun on the bottom. It is on top of a small rolling kitchen island that I got on clearance and so has storage too. So far it has not warped (have had it for at least 3 years if not more). It is super easy to change the cover, and works extremely well for ironing yardage or quilt tops.
My sewing room supply I love is a vacuum! Since my sewing space is also my bedroom, running a Roomba or using a hand vacuum to pick up stray threads and papers off the floor keeps it from feeling too stressful in a shared space.
A couple of things I learned from my first FPP project:
– If you are pre-cutting your fabric into rough cuts before paper piecing, always cut larger than you think you’ll need.
– Get a new seam ripper, because you’ll be using it 😉
Very excited to start working on my Eads quilt! I’ve got a small sewing space set up in an L shape. I have my industrial machine and a small cutting space to my left and my regular machine on my right. And the best thing that I find most useful with my setup is my rolling chair. I have a lovely old secretary chair but it was scuffing the floor, so my FIL gave me a similar old wooden secretary chair on castors, and the ability to roll over to other side and back again is wonderful!
I love my design wall – made by my husband! It’s in the family room and covers the space between two doors. It’s great for viewing my progress and taking photos!
I’ve been struggling to find space for a design wall. Think I’ll borrow your idea and use wall board.
I love my large desk to sew on. It is an old office desk with 4 drawers and is just perfect for me. I like having plenty of room to spread myself out. I also find my revolving cutting mat extremely useful.
Need to get to Ikea for the adjustable stool you have – looks perfect!
3M makes a removable tape that is really handy for repairing paper-piecing templates when you rip out a mistake. It doesn’t gum things up.
I need a better chair – preferably one that is adjustable – like your stool. otherwise I like my space. I keep my ironing board set up across the room so I have to get up often… better exercise and better for my back & legs.
I use a piece of template plastic for folding my paper piecing patterns and I also like to prefold all the lines before I start sewing. Takes one step out of the sewing process. 🙂 Your sewing space is lovely!
The favorite thing about my sewing space is the view! I look outside as I stitch and find it refreshing and inspiring!!
I too love having a pressing space nearby for PP projects. I made mine using a thrifted wooden folding tray, aka as a TV dinner tray when they became popular in years gone by. I covered the top with a layer of tin foil, then thin cotton batting, then a layer of thinsulate – like is used for making hot pads etc, then covered with a pretty cotton fabric. all is stapled to the back of the wooden top. A plus is that it folds up to be put away when not in use. Thanks for the great ‘getting prepared’ post, very helpful! Ann in NC
Thanks for all the tips. I’m very new at this, so still trying to figure out how to best use a small space. My husband made a large heavy-duty sewing table for me from reclaimed lumber. A section of one of the boards can be removed to reveal a dropped shelf for the sewing machine to sit flush. Love your old drafting table! May have to get that adjustable Ikea stool, too.
Thanks for sharing your tips! They’re very helpful, and I’m going to use some of them! I like a very neat sewing table, so I have an open curio shelf hanging up to the right of my machine that holds a lot of the supplies I need.
I love the add a quarter inch rulers for paper piecing.
VERY cool post! Thank you, Carolyn! – Jean
I have a power strip for my sewing machines and iron to plug into to help prevent problems with power surges, etc. And I try to always turn off the power at the strip due to grandchildren that are fascinated with my sewing machines😊
Useful tips there!! Thank you. I’m looking forward to EADS – going to try mixing my (precious) CF fabric with fabric from other shelves (!) and see how it goes. I like to burn essential oils while sewing, adds to the zen of sewing. I try to keep core tools within arms reach while sewing but clear up at the end of the session so it looks tidy and inviting for next session 😉
Thank you for sharing a glimpse into your sewing room along with your tips. I just have a small shared space to sew in so the top tip I have is to put tools and extra fabric away as soon as I’m done using them. It took some time to get used to sewing this way but now I really enjoy not having to try to work in a cluttered area. A bonus is that I really don’t have any cleanup when I’m done for the day or at the end of a project.
I need a stool for my left foot equal to the height of the pressure foot on the right. It helps my back pain.
I really enjoy your blog posts. You are very inspiring. I use an Ikea kitchen utility cart to store my sewing machine, fabric and tools in. When I am done for the day I just load up the cart and wheel it into the closet. Great for small spaces.
Hi Carolyn! I loved the pictures and descriptions of your sewing space. It gave me some ideas for my own. Thanks!
Your space looks amazing… mine is good but not so organized!! Thank you ! I need a design wall like yours!
I’m dreaming about big table, my own table. I have to use table in our dining room so when I start to sew I can’t leave all my stuff, fabrics etc. on the table. I have to clean it a few times a day when we want eat something. It’s very frustrating!
P.S. Sometimes we eat between scraps of fabrics 😊
I am addicted to those add a quarter rulers. I must have 5. They have been the most helpful ruler for paper piecing for me. And glue sticks. I couldn’t live with out them now.
The thread cutter attachment on the presser foot is life changing. 😂 I’d be really confused with out it. And so much less thread waste and mess is avoided.
I love the add a quarter quilt ruler. It is essential!!!
3 improvements I made this year have helped me cut down on wasted time looking for my tools that got ‘lost’ under fabric, patterns etc. on my work table. 1- A pegboard on the wall next to my cutting/work table so I have a place to hang tools when I’m not using them. 2- A magnetic knife holder from Ikea mounted to the side of my table so I can grab my scissors when I need them. 3- A spinny thing to hold marking pencil/pens and other skinny tools.
Clover’s flower head flat pins are a lifesaver for me when paper piecing. To me, they make the whole experience of paper piecing more fun ;-).
Cate
Thanks for tips and ideas! I try and keeps things organized and put away stuff if it is not needed but it doesn’t always work:)
Love your new designs. I’m still working on Hesperides….. I took over the kids lounge as my sewing space. It’s great because it’s right near the kitchen where all the action is. I bought them a smart TV and we all hang out together watching netflix while i’m sewing. It’s my favourite room in the house. Thanks for the tip about the thread cutter. Just ordered one on ebay as I am in Australia. Love my Janome 1600P 🙂
My kids gave me a medical adjustable rolling stool for Christmas about 25yrs ago. It has turned out to be absolutely fabulous for sewing. The padded seat is ridiculously comfortable to sit on for hours; with the simple adjustable height, it’s easy to change on the fly if needed. With no hand rests, there’s nothing to impede swinging around to cut or iron or collect a new stack to sew. Wheels let you easily slide over to the serger and back again. The lack of a back rest slowly forced me to develop better poster and habits.
Loved your post! My key tool is good additional lighting. I found a small light from a sewing machine store which I mount Med in the side of my machine and it has a flexible neck so I can position the light above the needle. It really helps
This looks like it will be so much fun. I haven’t done any paper piecing for quite awhile and never on such a large scale. Im shopping my stash and using what I think will work well.
What a great post about your space. Thanks for going through each bit of the setup so carefully and giving explanations of why you like it that way. It’s really helpful to think again about how things are set up and what might work better. I’ve just rearranged my space to have my main machine, serger and coverstitch along one wall so I can too between them. It also means that I have space to add a folding table in for certain projects – I wouldn’t want it there all the time. Thanks for the ideas! Looking forward to adding this QAL to my growing list of projects to keep up with. 🙂
Many other tips are ones I’d have mentioned, but it was redundant. However, one I can contribute from my first row of Eads is not to forget that with non-symmetrical blocks, because you’re working the fabric on the wrong side of the paper, to make sure you’re using the mirror opposite paper block to get the one you see in the quilt picture.
So my entire first row of Eads is mirrored 🙈 But I am leaving it that way and considering it my personalization.
Thanks for the tip, Marieke! You can also “collate” the templates as or after your print them so that it’s automatic. As for yours, I think they’ll be great! You’ll notice that I repeat alike blocks in mine as well. You can also flip some upside down to change it up. 🙂